App Development For Complete Beginners
Welcome to my blog where we’re exploring the basics of Android app development in 2023. If you’re currently trying to learn and get into a job, this is for you. If you’re itching to create cool Android apps, you’re in the right place.
Let’s talk plain and simple. Some old stuff we used in Android development? Gone. No need to stress over outdated tech. We’ll focus on what’s relevant right now, saving you time and energy.
We’ll start with the ABCs: What’s Android and how does it work? Ever wondered how apps show up on your phone? We’ve got that covered. We’ll also peek inside apps to see how they’re built – don’t worry, no rocket science here.
And guess what? Kotlin, the language we use for Android apps, has a great story. We’ll uncover how it’s made our lives as developers a whole lot easier.
So, if you’re all about crafting awesome Android apps, stick around. We’re going to learn, have fun, and level up together. Ready? Let’s roll!
Table of Contents
What is Android and how does it work?
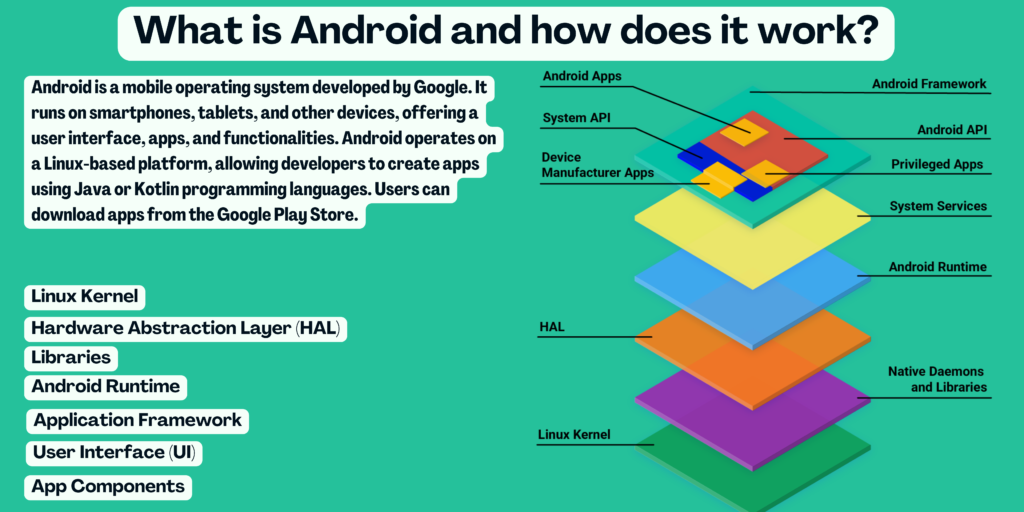
Android is an operating system developed by Google primarily for mobile devices like smartphones and tablets. It is based on the Linux kernel and is designed to provide a flexible and open platform for developers to create applications. Here’s a basic overview of how Android works:
- Linux Kernel: At the core of Android is the Linux kernel, which handles essential tasks like managing hardware resources, memory, and security.
- Hardware Abstraction Layer (HAL): The HAL provides a standardized interface for software to communicate with hardware components like the camera, sensors, and audio.
- Libraries: Android includes a set of libraries written in C and C++ that provide essential functions for developers. These libraries cover various areas like graphics rendering, networking, and database management.
- Android Runtime: Android uses a runtime environment to execute apps. In older versions, it used the Dalvik Virtual Machine, and in newer versions, it uses the Android Runtime (ART). These convert app code into a format that can be executed on the device’s processor.
- Application Framework: The framework provides high-level building blocks for creating apps. It includes components like Activities (UI screens), Services (background tasks), Content Providers (data sharing), and Broadcast Receivers (communication between components).
- User Interface (UI): Android’s UI is built using a combination of XML layouts and Java/Kotlin code. The UI components are organized into Views (UI widgets) and ViewGroups (containers for views).
- App Components: Apps are made up of various components that work together. The main components are Activities (UI screens), Services (background tasks), Broadcast Receivers (listen for system-wide events), and Content Providers (manage app data).

How Apps work in Android?
Android apps are software applications designed to run on devices that use the Android operating system, such as smartphones, tablets, smart TVs, and more. The Android operating system is developed by Google and is open-source, allowing developers to create and customize apps for a wide range of devices.
Here’s an overview of how Android apps work:
- Development: Android apps are typically developed using programming languages such as Java or Kotlin. Developers use the Android Studio Integrated Development Environment (IDE) to write, test, and debug their apps. Android Studio provides various tools and resources to assist developers in creating user interfaces, handling data, and implementing functionality.
- Components: Android apps are built using different components that interact with each other. The main components include:
- Activities: An activity represents a single screen with a user interface. It is a basic building block of an app’s user interface and represents a specific interaction the user can perform.
- Fragments: Fragments are modular UI components that can be combined in an activity to build a multi-pane user interface, adapting to different screen sizes and orientations.
- Services: Services are background tasks that run without a user interface. They can perform tasks such as fetching data, processing data, or handling notifications.
- Broadcast Receivers: Broadcast receivers listen for system-wide events or broadcasts and trigger actions when those events occur. For example, an app can respond to incoming SMS messages using a broadcast receiver.
- Content Providers: Content providers allow apps to securely share data with other apps, granting controlled access to databases or structured data.
- User Interface (UI): Android apps have user interfaces that consist of layouts, widgets, and views. Layouts define the structure of the user interface, widgets are interactive UI components like buttons and text fields, and views are the individual elements that make up the UI.
- App Lifecycle: Android apps have a lifecycle that determines how they are managed by the operating system. Apps can transition between different states, such as being launched, paused, resumed, or terminated. Developers need to manage these transitions to ensure proper behavior and performance.
- Permissions: Android apps require user permissions to access certain device resources or perform specific tasks. Permissions are requested at runtime to ensure that users have control over what data and features an app can access.
- App Distribution: Once an app is developed, it can be distributed through the Google Play Store or other third-party app stores. The app package is usually an APK (Android Package) file that contains the compiled code, resources, and metadata required for installation.
- Runtime Execution: When a user launches an app, the Android operating system loads the app’s code and resources into memory. The app’s components, such as activities, services, and broadcast receivers, are instantiated and executed based on user interactions.
- Inter-app Communication: Android apps can communicate with each other using explicit intents (calling a specific component of another app) or implicit intents (requesting an action to be performed by any app capable of handling it).
- Data Storage: Android apps can store data using various mechanisms, such as Shared Preferences (for simple key-value pairs), SQLite databases (for structured data), and external storage (for files like images and videos).
Overall, Android apps are designed to provide a rich and interactive user experience, leveraging the capabilities of the Android operating system and the hardware of the device on which they are installed.

How is an Android app structured?
Jetpack Compose for building your Android app’s user interface and you’re not using XML layout files, the app structure would be a bit different. Jetpack Compose is a modern UI toolkit that allows you to create your app’s UI using a declarative syntax in Kotlin code. Here’s how your Android app might be structured when using Jetpack Compose
- App Module: This remains the core module of your app, containing the main code, resources, and configurations.
- src Folder:
- src/main/java: Java or Kotlin source code for your app.
- com.example.myapp.activities: Contains activity classes (though activities may play a reduced role in Jetpack Compose apps).
- com.example.myapp.viewmodels: Contains ViewModel classes (if using MVVM architecture).
- com.example.myapp.adapters: Contains adapter classes or Compose functions to handle lists or grids.
- And other packages as needed.
- src/main/res: While you might use fewer XML layout files, you can still have other resource files such as strings, colors, and dimensions.
- src/main/java: Java or Kotlin source code for your app.
- AndroidManifest.xml: Contains essential app information, such as package name, components, permissions, and more. While Compose apps can have fewer activities, the manifest is still important for configuration.
- Gradle Files:
- build.gradle (Module): Configuration for the app module, including dependencies, build settings, and customizations.
- build.gradle (Project): Configuration for the entire Android project.
- Compose UI Code:
- In Jetpack Compose, you will define your UI directly in Kotlin code, using Compose functions to create components and layouts. Your UI code will be located within your activity or composables file.
- Composable Functions:
- Instead of XML layout files, you’ll have Kotlin functions called composables that define your UI components and layouts. These composables can be organized in a structured manner within your activity or composables file.
- ViewModels (MVVM):
- If you’re using the MVVM architecture, you’ll still have ViewModel classes that handle business logic and interact with your UI. These can be organized in a similar way as before.
- Adapters (if needed):
- If your app uses lists or grids, you can create custom Compose functions that act as adapters to handle the rendering of items.
- Resources (res folder):
- While you might not use XML layout files, you can still use the
resfolder for other resources like strings, colors, dimensions, and drawables that your Compose UI uses.
- While you might not use XML layout files, you can still use the
- Services, Fragments, etc.:
- Depending on your app’s architecture and needs, you might still have services, fragments, or other components. The organization of these components would depend on your overall app design.
- Gradle Plugins for Jetpack Compose:
- You’ll need specific Gradle plugins and dependencies related to Jetpack Compose. These are used to enable Compose functionality in your app.
Remember, the structure can still be customized based on your app’s complexity and architecture. Jetpack Compose promotes a more streamlined and cohesive UI development experience by enabling you to create your UI directly in Kotlin code, making the app structure more focused on code organization rather than XML layouts.
Which language for android app development?
I recommend learning Kotlin for Android app development. Kotlin is recommended by Google as the preferred language for building Android apps. It offers concise syntax, enhanced safety features, improved developer productivity, and seamless interoperability with Java. With official support and integration into Android Studio, Kotlin provides a modern and efficient way to create robust and feature-rich Android applications.
The Birth of Kotlin For Android App Development
Let’s kick things off with a little history. Imagine it’s 2011 and the folks at JetBrains (a cool tech company) were brainstorming how to make programming even better. They thought, “Wouldn’t it be amazing if we had a language that’s modern, expressive, and just plain enjoyable?” That’s when they waved their programming wands and conjured up Kotlin!
Kotlin was designed to make coding smoother and more fun, while also playing nicely with Java, another popular programming language. Think of Kotlin as the hip younger sibling of Java, here to make your programming journey even more exciting.

Setting Up Your Playground with Android Studio
Before we start crafting code, let’s set the stage, shall we? Imagine you’re in an artist’s studio, ready to create your masterpiece. In the world of programming, our studio is Android Studio – a powerful tool that’s about to become your creative haven.
Android Studio Installation: Don’t worry, this step is as easy as pie! Head over to the official Android Studio website, and keep an eye out for the download button. Click it and follow the prompts – before you know it, you’ll have your very own coding studio.
Creating Your Workspace: Open up Android Studio once it’s installed. It’s like entering your creative sanctuary. Click on “Start a new Android Studio project” and select “Kotlin” as your language. This is your blank canvas, ready for your coding brushstrokes.

Step 1: Install Android Studio If you haven’t already, download and install the latest version of Android Studio from the official website: https://developer.android.com/studio
Step 2: Create a New Project
- Open Android Studio.
- Click on “Start a new Android Studio project” or go to “File” > “New” > “New Project.”
Step 3: Configure the Project
- Choose “Phone and Tablet” as the form factor.
- Select “Empty Compose Activity” as the template.
- Click “Finish.”
Step 4: Code the “Hello World” Message
- Open the
MainActivity.ktfile. - Replace the existing code with the following:
Android Jetpack Compose is a modern toolkit for building native UIs in a declarative way. Here’s how you can create a “Hello World” app using Android Studio and Compose:
Step 1: Install Android Studio If you haven’t already, download and install the latest version of Android Studio from the official website: https://developer.android.com/studio
Step 2: Create a New Project
- Open Android Studio.
- Click on “Start a new Android Studio project” or go to “File” > “New” > “New Project.”
Step 3: Configure the Project
- Choose “Phone and Tablet” as the form factor.
- Select “Empty Compose Activity” as the template.
- Click “Finish.”
Step 4: Code the “Hello World” Message
- Open the
MainActivity.ktfile. - Replace the existing code with the following:
package com.example.helloworldcompose

import androidx.appcompat.app.AppCompatActivity
import android.os.Bundle
import androidx.activity.compose.setContent
import androidx.compose.foundation.layout.*
import androidx.compose.material.*
import androidx.compose.runtime.Composable
import androidx.compose.ui.Alignment
import androidx.compose.ui.Modifier
import androidx.compose.ui.tooling.preview.Preview
import androidx.compose.ui.unit.dp

class MainActivity : AppCompatActivity() {
    override fun onCreate(savedInstanceState: Bundle?) {
        super.onCreate(savedInstanceState)
        setContent {
            Greeting()
        }
    }
}

@Composable
fun Greeting(){
    Column(
        modifier = Modifier
            .fillMaxSize()
            .padding(16.dp),
        verticalArrangement = Arrangement.Center,
        horizontalAlignment = Alignment.CenterHorizontally
    ) {
        Text(text = "Hello, World!", style = MaterialTheme.typography.h4)
    }
}

@Preview(showBackground = true)
@Composable
fun DefaultPreview() {
    Greeting()
}
Step 5: Run the App
- In the top toolbar of Android Studio, click the green “Run” button (or press Shift + F10).
- Choose a device or emulator to run the app on.
- Wait for the app to build and install on the chosen device.
- Once the app launches, you’ll see the “Hello, World!” message displayed on the screen.
How to Develop Android Apps ?
Begin by setting up your environment. Install Android Studio for coding and testing. Equip with Java/Kotlin basics as they’re primary languages. Grasp Android fundamentals like activities, fragments, and layouts. Choose an app architecture like MVC or MVVM. Explore Jetpack components like ViewModel and LiveData for quality apps. Learn optional UI design using Jetpack Compose, a modern toolkit. Create a project in Android Studio with templates and settings. Build your UI via XML layouts or Compose functions. Code functionality, test comprehensively, and optimize performance. Handle app lifecycle and data storage with SharedPreferences or Room. Integrate APIs, publish through Google Play, iterate based on user feedback
Where to learn android app development?
If you’re looking to dive into the world of Android app development, there are several excellent resources to get you started on your journey. For a comprehensive guide, I’ve written a detailed blog that covers the essential steps and tips for beginners. Additionally, I’m excited to share that I’m in the process of publishing my own book that delves deeper into Android app development techniques and strategies. It’s a valuable resource that will provide you with the knowledge you need to create impactful apps. If you’re eager to learn more, I encourage you to check out my previous blog post, where I discuss the fundamentals of app development and set the foundation for what you’ll discover in the upcoming book.
How long does it take to learn Android App Development?
Learning Android app development is a journey with no fixed duration. If you’re new to programming, give yourself a few months to grasp the basics. For those with prior experience, understanding Android might take 6-12 months.
As you dive deeper, around another 6-12 months will help you tackle databases, networking, and more. Advancing further, about a year or more can get you creating custom views and animations.
Becoming a master? Well, that’s an ongoing adventure spanning years. Remember, don’t get frustrated. Remind yourself that everyone faces challenges at the start.
Is android app development a good career?
Android app development offers a promising and fulfilling career path due to the high demand for mobile applications in today’s digital landscape. The widespread popularity of Android as a mobile operating system ensures a continuous need for skilled developers. This demand translates into numerous job opportunities across various industries, providing developers with a diverse range of projects and challenges. Moreover, the flexibility to work as a freelancer or start one’s own app-based venture adds an entrepreneurial dimension to this career.
Please check out my earlier blog post for more insights. Happy reading!
How to be Productive When Working From Home