Table of Contents
What is a Clean Architecture?
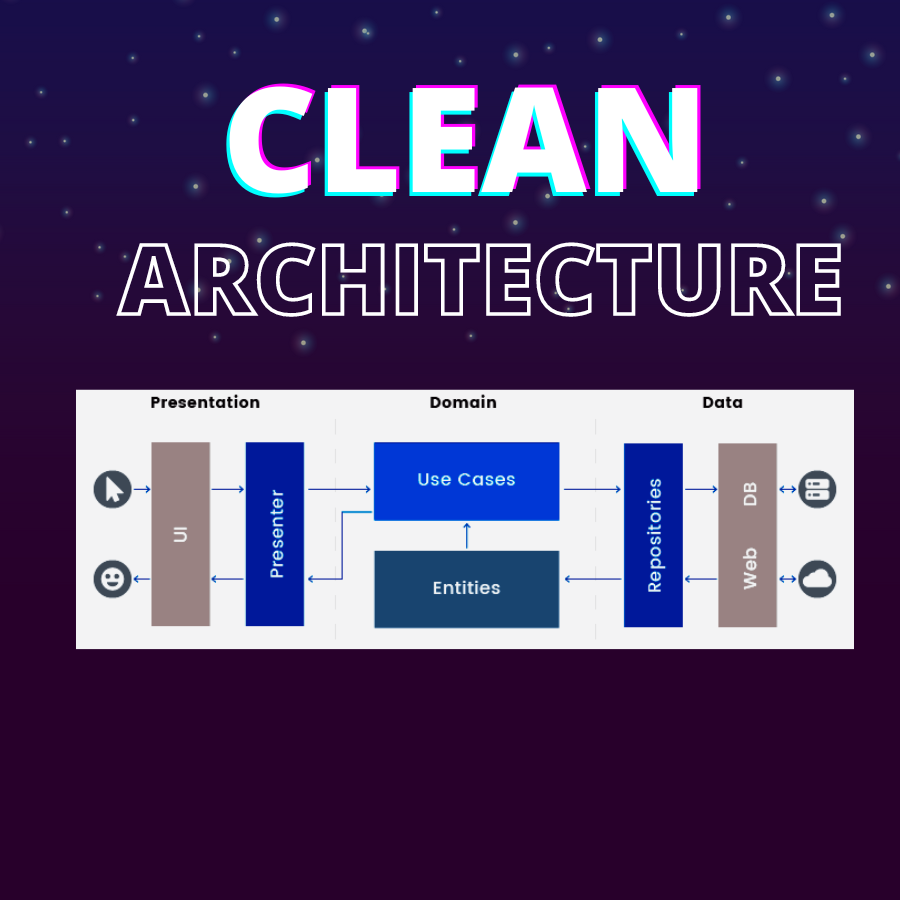
Imagine you’re building a house. In Clean Architecture, your codebase is like that house. It’s organized in distinct layers, each with its own purpose and responsibilities. Just like a house has an outer shell, rooms, and inner workings, Clean Architecture has layers: Presentation (UI), Domain (business logic), and Data (storage and external services). The key idea is to keep these layers independent so that changes in one layer don’t affect others.

What is MVVM in Android with example?
MVVM stands for Model-View-ViewModel, and it’s a design pattern used in software development, particularly in the context of building user interfaces for applications, including Android apps. MVVM is designed to help separate the concerns of an application’s UI, business logic, and data manipulation, making the codebase more modular, maintainable, and testable.
Imagine you’re making a to-do list app. The Model represents your tasks, the View is the UI displaying those tasks, and the ViewModel manages the data and interactions. So, when you check off a task in the UI, the ViewModel updates the Model, and the UI automatically reflects the change. This separation makes your code more maintainable and testable.
1. Clean Architecture Layers:
- Domain Layer (Use Cases): Contains the business logic and rules.
- Data Layer (Repositories): Deals with data sources like databases or APIs.
- Presentation Layer (UI): Handles the user interface and interactions.
2. MVVM Components:
- Model: Represents data entities and business logic.
- View: Represents the UI elements and layout.
- ViewModel: Manages the UI-related data and communication with the Model.
What is MVVM with Clean Architecture in Android?
MVVM (Model-View-ViewModel) and Clean Architecture are two distinct architectural concepts commonly used in Android app development. When combined, they provide a structured and maintainable way to design and develop Android applications. Let’s break down how MVVM can be integrated with Clean Architecture in Android:
- Clean Architecture Overview: Clean Architecture is a software architectural pattern introduced by Robert C. Martin. It promotes the separation of concerns by organizing an application into layers with specific responsibilities. The layers are typically organized from the innermost core to the outer layers:
- Entities: Represent the core business data structures.
- Use Cases (Interactors): Contain application-specific business rules.
- Interfaces (Gateways or Repositories): Define contracts for data access, enabling decoupling of the core from external frameworks.
- Frameworks & Drivers: Deal with external concerns like UI, databases, and frameworks.
- Integrating MVVM with Clean Architecture: When combining MVVM with Clean Architecture in Android, the following elements come into play:
- View (Activity/Fragment): The View layer remains primarily responsible for displaying UI components, handling user interactions, and binding to ViewModel.
- ViewModel: In the MVVM + Clean Architecture setup, the ViewModel layer incorporates both ViewModel responsibilities and part of the Use Case layer’s logic. It acts as a bridge between the View and the Use Cases, exposing data and methods the View can bind to.
- Use Cases (Interactors): These encapsulate the application’s business logic and use case-specific rules. Use Cases interact with the Entities and the data sources (repositories or gateways) to retrieve and process data. The Use Cases provide a clean API for the ViewModel to interact with the business logic.
- Entities: The core data structures remain unchanged and represent the business models.
- Interfaces (Gateways or Repositories): These contracts define how data will be accessed from various sources, such as a local database or a remote API. The implementation of these interfaces is usually placed in the outer layers, adhering to Clean Architecture’s separation principles.
- Frameworks & Drivers: The outermost layer encompasses the UI-related components, such as Activities, Fragments, and any Android-specific code, along with implementations of data source interfaces.
By combining MVVM with Clean Architecture, you achieve a highly modular, testable, and maintainable codebase. MVVM helps in keeping the UI code separate from the business logic, and Clean Architecture ensures that the dependencies flow inwards toward the core, maintaining a clear separation of concerns. This setup also promotes easier testing, as you can test the Use Cases and business logic independently of the UI.
Think of MVVM (Model-View-ViewModel) as the interior design of your rooms. MVVM is a design pattern that helps structure your app’s UI code. When you combine MVVM with Clean Architecture, you’re using a well-organized setup. The ViewModel acts as a bridge between the UI and the business logic, while the layers in Clean Architecture ensure a clear separation of concerns
What is the difference between Clean Architecture and MVC?
- MVC: Model-View-Controller also separates concerns, but the separation is not as strict as in Clean Architecture. The Model represents the data and business logic, the View handles UI presentation, and the Controller manages user input and updates the Model and View accordingly. However, in some implementations of MVC, there can be tight coupling between the Model and the View, making it harder to test and maintain.
| Aspect | Clean Architecture | Model-View-Controller (MVC) |
|---|---|---|
| Separation of Concerns | Strong separation with concentric layers (Entities, Use Cases, Interfaces, Frameworks & Drivers) | Separation into Model, View, and Controller |
| Dependency Direction | Dependencies flow inward; core logic independent of external components | Dependencies might be bidirectional |
| Flexibility | Highly modular and easily replaceable external components | Can lead to “Massive View Controller” issue |
| Maintainability | Enhanced maintainability due to clear separation of concerns | Depends on the specific implementation |
| Testability | Business logic can be tested independently; better unit testing practices | Testing can be more challenging |
How do you create a Clean Architecture?
| Step | Description |
|---|---|
| 1. Identify Layers | Understand and define the main layers of Clean Architecture: Domain, Data, and Presentation. |
| 2. Create Modules/Packages | Organize your codebase into separate modules or packages for each layer. |
| 3. Define Interfaces | Create interfaces that define interactions between layers (contracts). |
| 4. Implement Use Cases | In the Domain layer, implement core business logic as use cases (interactors). |
| 5. Implement Data Sources | In the Data layer, implement data sources like API clients or databases. |
| 6. Implement Repositories | Create repositories in the Data layer that bridge Domain and Data layers. |
| 7. Implement UI Components | Develop UI components (fragments, activities) in the Presentation layer. |
| 8. Implement ViewModels | Create ViewModels that manage UI data and interact with Domain layer. |
| 9. Dependency Injection | Use a DI framework to inject dependencies and maintain loose coupling. |
| 10. Set Up Communication | Ensure that outer layers depend on inner layers, adhering to the dependency rule. |
| 11. Test at Each Layer | Write unit tests for each layer to ensure component behavior. |
| 12. Handle Errors & Edge Cases | Consider error handling, validation, and edge cases in the architecture. |
| 13. Continuous Refinement | Continuously refine the architecture as the app evolves. Maintain modularity and adhere to SOLID principles. |
Each step contributes to creating a well-structured and maintainable app architecture based on Clean Architecture principles.
How to implement Clean Architecture Android?
In this example, we’ll create a simple to-do list app where users can add tasks.
1. Create the Domain Layer (Use Case):
First, define the business logic for adding tasks
// TaskUseCase.kt
interface TaskUseCase {
    fun addTask(task: Task)
}

// Task.kt
data class Task(val name: String)
2. Create the Data Layer (Repository):
Implement the repository that handles tasks data.
// TaskRepository.kt
class TaskRepository : TaskUseCase {
    private val tasks = mutableListOf<Task>()

    override fun addTask(task: Task) {
        tasks.add(task)
    }

    fun getAllTasks(): List<Task> {
        return tasks.toList()
    }
}
3. Create the Presentation Layer (Jetpack Compose UI):
Now, let’s create the user interface using Jetpack Compose.
// MainActivity.kt
class MainActivity : AppCompatActivity() {
    private lateinit var viewModel: TaskViewModel

    override fun onCreate(savedInstanceState: Bundle?) {
        super.onCreate(savedInstanceState)
        viewModel = TaskViewModel(TaskRepository())
        setContent {
            MainScreen(viewModel)
        }
    }
}
// TaskScreen.kt
@Composable
fun TaskScreen(viewModel: TaskViewModel) {
    var taskName by remember { mutableStateOf("") }

    Column(
        modifier = Modifier
            .fillMaxSize()
            .padding(16.dp)
    ) {
        TextField(
            value = taskName,
            onValueChange = { taskName = it },
            label = { Text("Task Name") },
            modifier = Modifier
                .fillMaxWidth()
                .padding(bottom = 8.dp)
        )
        Button(
            onClick = { viewModel.addTask(Task(taskName)) },
            modifier = Modifier.fillMaxWidth()
        ) {
            Text("Add Task")
        }
        Spacer(modifier = Modifier.height(16.dp))
        TaskList(tasks = viewModel.tasks)
    }
}
// TaskList.kt
@Composable
fun TaskList(tasks: List<Task>) {
    LazyColumn {
        items(tasks) { task ->
            Text(text = task.name, modifier = Modifier.padding(8.dp))
        }
    }
}
4. Create the ViewModel:
Create the ViewModel that connects the UI with the Use Case.
// TaskViewModel.kt
class TaskViewModel(private val taskUseCase: TaskUseCase) : ViewModel() {
    val tasks: List<Task> = mutableListOf() // Store tasks here

    fun addTask(task: Task) {
        taskUseCase.addTask(task)
        tasks.toMutableList().add(task) // Update the tasks list
    }
}
In this example:
- The
TaskUseCasedefines the business logic of adding tasks. - The
TaskRepositoryhandles tasks data. - The UI is implemented using Jetpack Compose in
TaskScreen.kt. - The ViewModel,
TaskViewModel, connects the UI with the business logic. - The
TaskListcomposable displays the list of tasks.
Remember that this is a simplified example to help beginners understand Clean Architecture and Jetpack Compose integration. In a real-world application, you would need to handle more features like data persistence, error handling, and navigation.
What is Android MVVM vs clean?
Android MVVM:
- Focuses on UI and data interaction.
- Components: Model, View, ViewModel.
- Uses data binding and LiveData.
- Modular and testable UI code.
Clean Architecture:
- Focuses on overall app structure and separation of concerns.
- Layers: Entities, Use Cases, Interfaces, Frameworks & Drivers.
- Enforces strict dependency rules.
- Makes core business logic independent of external components.
In short, MVVM is UI-centric, while Clean Architecture emphasizes overall app organization and separation of concerns for maintainability and flexibility.
An example of a project structure for an Android app using Clean Architecture with Jetpack Compose
app
│
├── build.gradle
│
├── src
│   ├── main
│   │   ├── java
│   │   ├── kotlin
│   │   │   ├── com
│   │   │       ├── yourcompany
│   │   │           ├── app
│   │   │               ├── di
│   │   │               │   ├── AppModule.kt
│   │   │               │   ├── AppComponent.kt
│   │   │               │   ├── SubcomponentsModule.kt
│   │   │               │
│   │   │               ├── domain
│   │   │               │   ├── model
│   │   │               │   │   ├── Entity.kt
│   │   │               │   │
│   │   │               │   ├── repository
│   │   │               │       ├── Repository.kt
│   │   │               │
│   │   │               ├── presentation
│   │   │               │   ├── ui
│   │   │               │   │   ├── MainActivity.kt
│   │   │               │   │   ├── MainScreen.kt
│   │   │               │   │
│   │   │               │   ├── viewModel
│   │   │               │       ├── MainViewModel.kt
│   │   │               │
│   │   │               ├── usecase
│   │   │                   ├── UseCase.kt
│   │   │
│   │   ├── res
│   │       ├── values
│   │           ├── strings.xml
│   │
│   ├── test
│       ├── java
│       ├── kotlin
│           ├── com
│               ├── yourcompany
│                   ├── app
│                       ├── presentation
│                           ├── MainViewModelTest.kt
│
└── build.gradle
App Folder Structure Explanation:
app: This is the main module of your app.build.gradle: A configuration file for building the app.
src/main: This is where your main code resides.javaandkotlin: These are folders for different programming languages; developers write code here.com/yourcompany/app: This is where your app’s code is organized.di: Stands for Dependency Injection; it’s a way to manage how different parts of the app interact.AppModule.kt: A file that configures the app’s dependencies.AppComponent.kt: A component that manages dependencies across the app.SubcomponentsModule.kt: Configurations for different parts of the app.
domain: This is where the core rules and data of the app are defined.model: Defines the main data structures that your app uses.Entity.kt: Defines a type of data your app uses, like a user or an item.
repository: This is like a storage place for the app’s data.Repository.kt: Defines how the app interacts with data, like saving or retrieving it.
presentation: This is about how the app looks and interacts with users.ui: This is where the different screens and user interfaces are defined.MainActivity.kt: Defines the main screen of the app.MainScreen.kt: Contains code for how the main screen looks and works.
viewModel: Handles how the data is displayed and updated on the screen.MainViewModel.kt: Manages data and interactions for the main screen.
usecase: Contains specific tasks the app needs to perform.UseCase.kt: Defines a particular task or action the app can do.
res: Stands for “resources,” where non-code stuff like layouts and strings are stored.values: Holds things like text strings used in the app.strings.xml: A file with text that the app uses.
test: This is where developers write tests to make sure the app works as expected.javaandkotlin: Similar to thesrc/mainfolders, but for tests.com/yourcompany/app: Where tests for your app’s code are organized.presentation: Tests for UI components and ViewModel.MainViewModelTest.kt: A test specifically for theMainViewModel.
build.gradle: Another configuration file, this time for the entire module.
The structure helps developers organize and man
An example of a multi-module Android app project structure using Clean Architecture and Jetpack Compose
app
│
├── build.gradle
│
├── settings.gradle
│
├── core
│   ├── build.gradle
│   ├── src
│       ├── main
│           ├── java
│           ├── kotlin
│               ├── com
│                   ├── yourcompany
│                       ├── core
│                           ├── domain
│                               ├── model
│                               │   ├── Entity.kt
│                               │
│                               ├── repository
│                                   ├── Repository.kt
│
├── feature_home
│   ├── build.gradle
│   ├── src
│       ├── main
│           ├── java
│           ├── kotlin
│               ├── com
│                   ├── yourcompany
│                       ├── feature_home
│                           ├── di
│                               ├── HomeComponent.kt
│                               ├── HomeModule.kt
│                           ├── presentation
│                               ├── ui
│                                   ├── HomeScreen.kt
│                           ├── viewModel
│                               ├── HomeViewModel.kt
│                           ├── usecase
│                               ├── LoadHomeDataUseCase.kt
│
├── feature_profile
│   ├── build.gradle
│   ├── src
│       ├── main
│           ├── java
│           ├── kotlin
│               ├── com
│                   ├── yourcompany
│                       ├── feature_profile
│                           ├── di
│                               ├── ProfileComponent.kt
│                               ├── ProfileModule.kt
│                           ├── presentation
│                               ├── ui
│                                   ├── ProfileScreen.kt
│                           ├── viewModel
│                               ├── ProfileViewModel.kt
│                           ├── usecase
│                               ├── LoadProfileDataUseCase.kt
│
├── build.gradle
│
└── buildSrc
    ├── build.gradle.kts
    ├── src
        ├── main
            ├── kotlin
                ├── Dependencies.kt
                ├── Versions.kt
In this structure:
appmodule is the main application module.coremodule contains the core domain logic, entities, and repositories.feature_homemodule is an example feature module for the “Home” functionality.feature_profilemodule is an example feature module for the “Profile” functionality.buildSrcmodule is used for centralized dependency management.
Each feature module follows the same structure:
dipackage contains Dagger Hilt components and modules.presentation/uipackage contains Jetpack Compose UI components.viewModelpackage contains Jetpack ViewModel classes.usecasepackage contains application-specific use cases.
This multi-module structure keeps the app organized, modular, and follows Clean Architecture and Jetpack Compose principles. It allows you to work on different features independently and manage dependencies more effectively. Keep in mind that the structure may need to be customized based on your specific project requirements and team preferences.

Feel free to follow and join my email list at no cost. Don’t miss out — sign up now!
Please check out my earlier blog post for more insights. Happy reading!
The Innovative Fundamentals of Android App Development in 2023
How to learn Android App Development in 2023 – Full Guide For Beginners using Kotlin Language
Ultimate Guideline on How to Use ViewModel Design Pattern
What is the Repository Pattern in Android? A Comprehensive Guide
What is ViewModel in Android? A Good Guide for Beginners
The Innovative Fundamentals of Android App Development in 2023
How to Say Goodbye to Activity Lifecycle and Say Hello to Compose Lifecycle ?
How to Monitor/Observe Network Availability for Android Projects
Exploring Sealed Class vs Enum in Kotlin Which is Best for Your Code?
What is the difference between Functional Programming and OOP?


